How to Broadcast with OBS Studio or a Mobile RTMP Encoder

How to Broadcast with OBS Studio or a Mobile RTMP Encoder

The HTML5 Videochat interface accepts RTMP streams from any encoder — OBS Studio on desktop, Larix Broadcaster on mobile, or any other RTMP-compatible app. This enables professional-quality streaming from dedicated hardware or software without being limited to browser-only broadcasting.


Requirements

– A site running Broadcast Live Video with a VideoWhisper Server or Wowza SE connection

– A channel configured with roomInterface = html5app (HTML5 Videochat)

– OBS Studio (PC/Mac/Linux) or Larix Broadcaster (iOS/Android)


Getting Your Stream Settings

  1. Log in to your site and go to your channel page
  1. From the channel menu, open External Encoders (or Broadcast → External Apps)
  1. Copy the Server URL and Stream Key shown for your channel

These two values are all you need to configure any RTMP encoder.


Setting Up OBS Studio

  1. Open OBS → Settings → Stream tab
  1. Set Service to Custom
  1. Paste your Server URL into the Server field
  1. Paste your Stream Key into the Stream Key field
  1. Click Apply and OK
  1. Click Start Streaming

Recommended OBS settings:

– Video bitrate: 1000–4000 kbps depending on resolution

– Audio bitrate: 128–192 kbps

– Resolution: 1280×720 or 1920×1080

– Encoder: x264 (software) or hardware encoder if available


Setting Up Larix Broadcaster (Mobile)

Larix Broadcaster is a free, professional RTMP app for iOS and Android — the recommended replacement for the discontinued Wowza GoCoder.

  1. Download Larix Broadcaster from the App Store or Google Play
  1. Open Settings → Connections → tap + to add a new connection
  1. Enter a name (e.g., your site name)
  1. Set URL to your Server URL + / + your Stream Key (combined as one RTMP URL, e.g., rtmp://your-server/live/streamkey)
  1. Tap Save and return to the main screen
  1. Tap the record button to start streaming

Viewers Watch via HLS/DASH

Once your encoder starts sending RTMP, the channel automatically becomes live. Viewers on your site watch via:

– HLS — iOS, Android, and all mobile browsers

– MPEG-DASH — desktop browsers with adaptive bitrate

– WebRTC — if available, for lowest latency playback Chat is active alongside the stream for real-time viewer interaction.

See Also

– Videochat & Tipping Platform →

– Get a Turnkey Hosted Site →

How to Publish an IP Camera RTSP Stream to Your Website

How to Publish an IP Camera RTSP Stream to Your Website

This tutorial covers publishing IP camera streams to website pages using Broadcast Live Video. Browsers cannot play RTSP directly — the VideoWhisper Server handles conversion to DASH/HLS for browser-native playback.


Requirements

– A site running Broadcast Live Video with VideoWhisper Server (included in site2stream.com plans)

– An IP camera with an accessible RTSP address

– Network access from the streaming server to the camera’s RTSP port (usually 554)


Step 1: Set Up an IP Camera Channel

  1. Log in and go to Broadcast Live → Manage Channels
  1. Click Add Channel → select IP Camera / Restream as the channel type
  1. Give the channel a name and save

Step 2: Enter the Camera’s RTSP Address

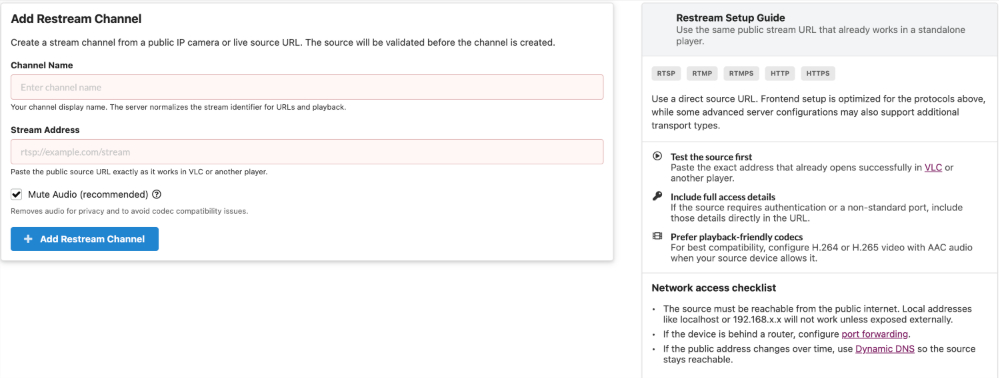
In the channel setup form, enter your camera’s RTSP stream URL: Supported formats:

– rtsp://username:password@192.168.1.100:554/stream1

– rtmp://your-source/live/streamkey

– https://your-source/stream.m3u8 (HLS input)

– udp://239.0.0.1:1234 (multicast) Tips:

– Test the RTSP URL in VLC first to confirm it works before entering it here

– H.264 video + AAC audio is recommended for best compatibility

– If the camera requires a username/password, include them in the URL

– If your camera is behind a router, port-forward port 554 to the camera’s local IP After entering the URL and saving, the server will attempt to connect. If successful, a live snapshot will be displayed.


Step 3: Configure Access Control (Optional)

By default, the channel is public. To restrict access: – Members only: Set the channel to require login

– Specific users: Add allowed users to the channel access list

– Paid access: Configure myCRED pay-per-channel pricing This is the key feature for use cases like Airbnb guest access, pet hotel owner access, and daycare parent portals — each channel’s access list controls exactly who can see that camera.


Step 4: View the Live Channel

The channel page uses the VideoWhisper Restream Player to display the stream as MPEG-DASH or HLS. Viewers see the live feed in any browser with no plugin or app required. The channel listing page shows live/offline status based on stream health and updates thumbnails automatically.


Troubleshooting

– Stream not connecting: Verify the RTSP URL works in VLC from the server’s network location

– No public camera IP: Configure port forwarding on your router, or set up Dynamic DNS if your ISP doesn’t provide a static IP

– Non-standard port: Ensure the port is open in your firewall and router

– Wrong codec: Re-configure the camera to output H.264 + AAC if possible


See Also

– IP Camera Streaming Scenario →

– Get a Turnkey Hosted Site →